

The Two Best Intervals to Increase VO2 Max

Updated On
July 27, 2026
CHOOSE YOUR FORMAT
►WATCH THE VIDEO
►LISTEN TO THE PODCAST
►READ THE ARTICLE
The Two Best Intervals to Increase VO2 Max
Hard interval workouts make up a relatively small percentage of total training time, but they are critically important for maximizing performance. If you have been diligently executing your VO2 max intervals but you’re not seeing improved performance, you’re likely doing the wrong kind of workout, or the right workout at the wrong time. After 20 years of coaching endurance cyclists and bike racers, I’ve learned there are two best intervals to increase VO2 max. I’ll show you how to use them at the right times, an in the right amounts, to go faster than ever.
What is VO2 Max?
In simple terms, VO₂ max is the maximum amount of oxygen your body can take in, transport, and use during exercise. Think of it as the size of your aerobic engine.
A larger aerobic engine allows you to:
- Produce more power aerobically.
- Sustain higher intensities longer.
- Recover more quickly between hard efforts.
- Perform better across nearly every cycling discipline.
While genetics influence your ultimate ceiling, well-designed training can substantially improve your aerobic capacity. For more details on the basics of VO2 max, see this article.
Where VO2 Max Work Fits Into Annual Training
One mistake athletes make is trying to improve VO₂ max before maximizing their aerobic foundation. A strong aerobic base comes first, and that’s achieved by maximizing training volume at easy intensities, then pushing up your FTP. After that, it’s time to focus on VO2 max.
What many riders get wrong is believing all VO2 max workouts are basically the same. They’re all hard, but hard efforts don’t all produce the same stress or stimulate the same adaptations.
There are two high-intensity strategies I use to increase VO2 max:
- Long, steady, hard intervals at Zone 5
- Shorter, hard on/off intervals at Zone 5–6
I’ve tried all manner of complicated and simple combinations of interval durations and rest periods, different intensity schemes, etc. In the end, these two interval strategies have proven to be the most effective for the amateur, master, junior, and elite cyclists I’ve coached.
VO2 max Workout Strategy 1: Longer, Hard Intervals
These are your classic 3–5 minute, near-max efforts. “Long” is relative, meaning these intervals are limited by your fitness and your ability to maintain the intensity. Once intensity drops, you’re not achieving the targeted power and there’s no reason to continue. It’s better to align the interval duration with your ability to execute high-quality efforts. Depending on your current fitness and goals, interval length can range anywhere from as short as 2 minutes to as long as 6–8 minutes.
Example workout structure:
- Beginners: 4 x 3 minutes, with 3 minutes easy between
- Intermediate: 4×4 minimutes, with 4 minutes easy between
- Advanced riders: 5 x 5 minutes, with 4–5 minutes easy between
Intensity: 106–121% of FTP (Zone 5). Each interval should feel like a 9-10 out of 10 on your Rate of Perceived Exertion (RPE) scale. These will feel very hard.
Total time in zone: Aim for a minimum of 10–15 minutes for beginners, 15-20 minutes for intermediates and masters, 20-25 minutes for racers and competitive masters, up to 25–30 minutes for advanced riders. In that 5×5 example, 5 times 5 equals 25 minutes of total time in zone. I rarely have even my best racers complete more than 30 minutes time-in-zone in a single VO2 max session.
Work-to-rest ratio: I typically use a 1:1 ratio, so 5 minutes recovery between 5-minute intervals. Some athletes, mostly the advanced athletes using longer intervals, benefit from slightly shorter recoveries to increase training density and maintain elevated heart rate and ventilation.
These are time-tested, research-proven intervals for increasing your power at VO2 max. The longer you go, the more you increase your heart rate and ventilation at VO2 max. More time breathing hard, which is exactly what you need to elicit a VO2 max response. Recovery between intervals should be enough to repeat a quality effort, but you’re not going to feel entirely fresh when the next interval begins.
Common Mistakes with Longer VO2 max Intervals
- Not going long enough. I see a lot of athletes doing one-minute “VO2” efforts. One minute hard is a strenuous effort, but it doesn’t give you enough of the heart rate or ventilatory response needed to elicit a VO2 max adaptation.
- Too much recovery. Recover too long and you minimize the stress response. If you were to spread that 5×5 workout over a two-hour ride with 10–15 minutes of easy riding between efforts, you’re achieving the time in zone but losing out on the advantage of compounding effort. If your goal is specifically to raise VO2 max, shortening recovery to 3–5 minutes increases the “work density” of the main set. Shorter recoveries force ventilation up, increase fatigue, and put more effective stress on the system.
- Not going hard enough. Done right, VO2 max work is very hard and probably not all that pleasant in the moment. The results are worth the effort, I promise! Nevertheless, because these workouts are hard, some athletes pull their punches, aim for the minimum intensity and smallest number of efforts, and don’t really check to see if they’ve gone hard enough. With VO2 max intervals, it’s the intensity (the power, heart rate, ventilation, repeatability) that makes the biggest impact. Start by confirming your FTP or critical power values are current so your zones are set properly. Then individualize the interval duration based on the information above.
VO2 max Workout Strategy 2: Shorter, Harder On/Off Intervals
These are your classic “30-30s”, “40-20s”, or the increasingly popular “30-15s”. In other words, 30 seconds at 9/10 RPE, followed by 30 seconds easy spinning (not coasting!) before the next short effort.
A quick comparison:
- 30-30s are a good entry point to on/off work. Easy to remember and execute, but the 1:1 work-to-rest ratio means slightly reduced density, stress, and strain. That’s good for a while, and then it’s time to progress to a 2:1 work-to-rest ratio.
- 40-20s incorporate a 2:1 work-to-rest ratio but can be mentally tough due to the longer “on” portion.
- 30-15s tend to be the most effective at stressing the VO2 max system because the shorter recovery keeps heart rate and ventilation elevated. They can be more difficult to execute, however, if you’re trying to do the start/stop math in your head (structured workouts downloaded to your cycling computer or indoor trainer help here).
Total time-at-intensity: I schedule these efforts by total block time, which could look like: “3 x 10 minute 30-30s”. You start with 30 seconds hard and just keep alternating 30 “on” 30 “off” for 10 minutes. In this case, that adds up to 5 minutes of hard pedaling time per block, and 15 minutes total for the workout. No matter whether I’m using 30-30s, 40-20s, or 30-15s, I typically aim for 15–30 minutes total time, which typically translates to about 8–15 minutes of actual hard pedaling time.
► Free Cycling Training Assessment Quiz
Take our free 2-minute quiz to discover how effective your training is and get recommendations for how you can improve.
Key component: With on/off intervals, time in zone for heart rate/breathing and time in zone for power will not match like they tend to with longer intervals. With on/off work, heart rate and ventilation spike quickly because the power is so high, and they stay elevated through the short recovery periods when power falls.
The elevated heart rate and ventilation are crucial for stimulating the adaptation we’re looking for, but you need short recovery periods in order to repeat efforts powerful enough to keep them elevated!
Pro Tip: Use Maximal Aerobic Power (MAP), Not FTP, For Interval Intensity
Here’s where things get a little more nuanced. For short, on-off intervals, I prefer to anchor interval intensity to maximal aerobic power (MAP) instead of Functional Threshold Power (FTP). For review, FTP is your maximum sustainable power output and it’s generally determined from a 20-minute field test or modeled from your long-term training data. In contrast, MAP is essentially your best 5- to 6-minute maximum power from the past 2-3 months. Based on current research, including protocols from Dr Stephen Seiler (videos here and here), I recommend doing short, on-off VO2 max workouts at 95-100% of MAP.
Why does MAP vs. FTP matter? Two riders can share the same FTP but have very different anaerobic capacities.
For example:
- Rider A: FTP of 330W, MAP of 450W
- Rider B: FTP of 330W, MAP of 400W
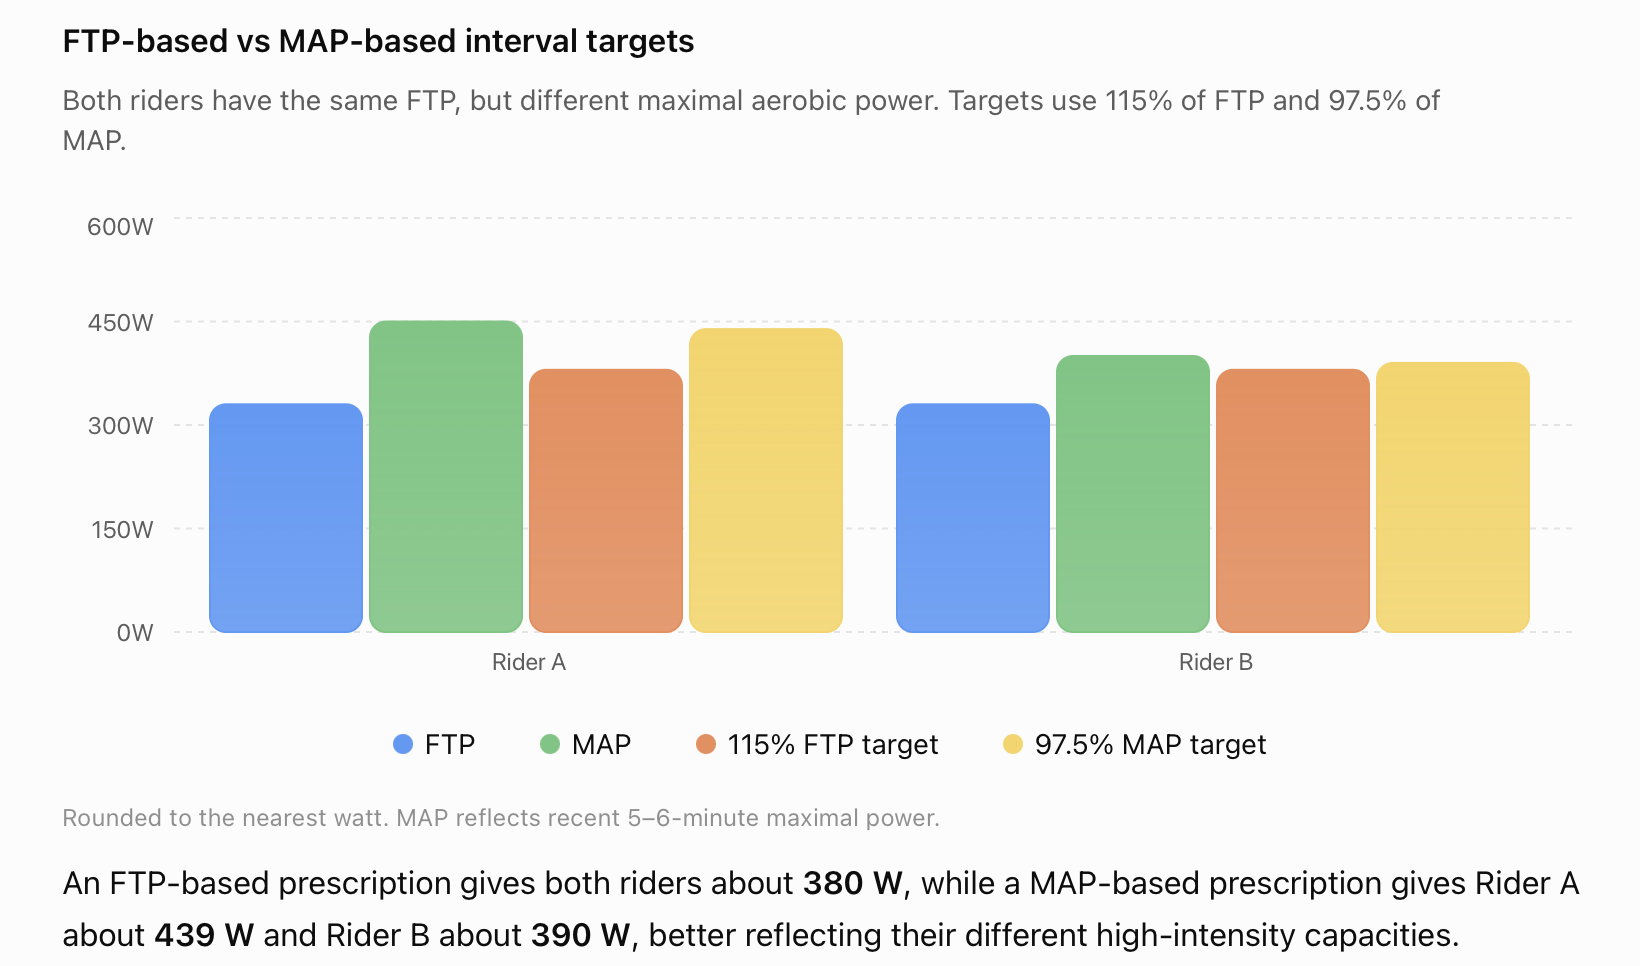
If both riders execute their on-off intervals at 110–120% of FTP, they’ll hit the same target power. However, the workout will be easier for Rider A than Rider B, meaning Rider A won’t get as much out of it. When efforts get short and very hard, there’s a higher anaerobic component to the energy contribution. As a result, you need a power target that reflects how the power is being produced. MAP captures more of that anaerobic contribution, which is exactly the system you’re trying to stress.
How to Determine Maximal Aerobic Power (MAP)
You can measure MAP in a lab test, but it’s perfectly acceptable to use your best recent 5-minute power from training data over the past three months. If you don’t have data from recent hard efforts or field tests, use 120% of FTP as a starting point and adjust up or down until RPE is 9-10 out of 10 for these short efforts. Sprinter-types often push a little higher percentage of FTP, climber-types often push a little lower percentage of FTP.
How to set your personal MAP targets:
- “On” portions of 30-15s: 95–100% of your peak 5-minute power
- “Off” portions 30-15s: 30–40% of that same number
Example: If you’re peak 5-minute power is 420W, then the “on” portions should be 400-420W and the “off” portions would be 125–170W. For 40-20s: decrease the “on” power slightly, since the effort is a bit longer. And for 30-30s: increase the “on” power slightly, since the recovery is a bit longer
Pro Tip: You Might Need To Create MAP-based Workouts Manually
Not all training software programs currently let you build workouts based on MAP. Some will only let you create workouts based on FTP-based zones. You may need to translate your MAP-based number into a percentage of FTP for your workout builder. It’s a bit clunky right now, but that’s the reality of most current tools.
There’s real trial and error here. If you try a workout at 95–100% of your 5-minute max and it feels too easy, bump the power up by 10–15 watts and try again. These workouts should not feel easy and homing in on the best percentage of MAP can be a challenge. Your intensity setup may vary based on whether you’re a climber, all-rounder, sprinter, new to the sport, or a seasoned rider.
Common Mistakes with On/Off Intervals
On-off VO2 max intervals are an advanced workout style. They seem simple, but the devil is in the details. Here are the mistakes I see athletes make most often:
- Going too hard, too soon. These workouts create a lot of stress, so it’s better to start conservatively and add time or intensity if you err on the easy side.
- Using the wrong anchor. MAP is generally a better way to personalize these workouts, compared to FTP.
- Not going long enough. The value of these workouts comes from the prolonged duration at elevated heart rate and ventilation rate. Don’t make the mistake of cutting down the total time.
- Taking too much recovery. The whole point is to keep heart rate and ventilation rate high. You’re barely going to recover between these efforts, and that’s on purpose.
- Believing there’s only one “right” protocol. The Rønnestad protocol is popular right now, and it’s a genuinely effective session: 13 x 30 seconds “on”, 15 seconds “off” at 95–100% MAP with only 3 minutes of recovery between blocks. It’s a brutal, advanced workout that’s not right for everyone. If you’re newer to the sport or to this style of training, start less aggressively and build toward something like the Rønnestad protocol over time. Similarly, if your goal race features even more specificity, you can adapt the protocol to suit your needs. For example, a 2×20-minute minute session of 30-30s on a climb is an effective (yet brutal) variation I use with some athletes.
Putting It All Together: When to Use Each VO2 max Strategy
If you have the time in your season, I think using both methods, in sequence, is the most effective approach.
Here’s my preferred framework, starting roughly 7–8 weeks out from your goal race:
- 3-week block of long, hard VO2 intervals twice per week. Separate the interval days by at least one day of recovery, preferably two.
- Recovery week
- 2–2.5 week block of shorter on/off intervals. Separate the interval days by at least one day of recovery, preferably two.
- Taper into the race
Two VO2 sessions per week is typically the right dose for most riders balancing group rides and weekend volume. During this period, aim for moderate volume, around 80% of your typical high-volume weeks, to offset fatigue and keep you fresh for the intensity days. In the taper itself, drop volume, keep intensity high, maintain riding frequency, and arrive fresh on race day.
Why sequence it this way? Each strategy develops something different:
- Long, hard VO2 intervals exert an upward pull on your sustainable power (see this article for more on the concept of “pulling” sustainable power up).
- Short on/off intervals sharpen aerobic power while preparing you for the repeated surges common in racing.
The Bottom Line
You can increase your VO2 max in more than one way. The best long-term strategy starts with building aerobic capacity over a long period of time. Then, as you approach your A race — typically 7–8 weeks out — your final prep should involve a few weeks of long, hard VO2 work followed by on/off work to best prepare for the specific demands of racing.
Go try this stuff. Have fun with it. Don’t be afraid to fail a little — that’s usually when you learn the most.
► FREE Mini-Course: Learn How to Maximize Your Limited Training Time
Learn step-by-step how to overcome limited training time and get faster. Walk away with a personalized plan to increase your performance.

About the Author
Adam Pulford
CTS Head Cycling Coach
Adam Pulford is a dedicated coach at CTS with a passion for elevating athletic performance through tailored, measurable strategies and a deep understanding of the “why” behind each athlete's goals. With nearly two decades of experience, a degree in Exercise Physiology, and a successful track record managing professional cycling teams, Adam also shares his expertise as the host of the Time-Crunched Cyclist podcast, providing actionable insights for endurance athletes.