5 Great Yoga Postures For Cyclists, Triathletes, and Runners
By Mara Abbott,
Olympian, yoga expert, and CTS Contributing Editor
A yoga posture is the period at the end of a sentence. It may be important, but it is a very small part of the whole, signaling simply a brief space for pause before next phrase begins. The real meat of your yoga practice – the words, commas, dashes, and parenthetical asides – is the movement as you transition from one pose and settle into the next. As endurance athletes, we are focused on goals and the straightest path to achieve them. Our movements are also incredibly linear. We repeat the same action, activate the same muscles and exist almost exclusively in a single plane of motion. Practicing yoga is an exploration rather than a to-do list.
Advice Before You Start
Move slowly. Move deliciously slowly. We just got a new yoga studio in my hometown of Boulder, Colorado – where there is already a yoga studio for approximately every 5.26 residents. “It’s like yoga on caffeine,” read the newspaper ads. For me, at least, that is the absolute last thing in the world that I need. If you too are involved in regularly testing your body’s athletic limits, release the need to accomplish something with your yoga. Be fluid. Experiment with subtlety. Simply enjoy moving. If you absolutely must be competitive about it (and I, for one, must) remember that in yoga, you always get to win.
Finally, even when you imagine you are holding still, you always continue to breathe. Notice how your breath affects your postures, and exaggerate it. As you inhale, back out of the pose slightly. As you exhale, allow yourself to deepen in. A tip: holding a position as stiffly as possible will rarely generate supple joint and muscles. So pulse.
Five Favorite Yoga Postures
Here are five of my favorite yoga postures. My body experience is cycling-dominant, but these poses are equally beneficial for anyone in a leg-dominant endurance sport. I’ve included tips and instructions for each, but I encourage you to find a local teacher to help you discover individual alignment cues or modifications. If you aren’t a fan of studio classes, have trouble with scheduling, or need a more efficient practice you can take on the road, many instructors offer private sessions. This can be a great way to craft a practice that works with your schedule, your body, and your budget (studio drop-ins add up fast!). Starting from where you are is the best way to make yoga a habit.
Surya Namaskar B (Sun Salutations)
There is a reason sun salutations are one of the most basic and well-known elements of a yoga class. The simple sequence of postures decompresses the low back, opens the hamstrings, quads, hip flexors and chest, and it engages the core. It generates movement and heat through your joints and creates a rhythm in your breath. Focus on rolling through the sequence like a wave – each pose is a crest, but is smoothly flows into the next without pause.
Two optional variations:
I usually prefer to use a cobra posture in place of upward facing dog to decrease pressure on the low back. If you choose cobra, you can either press through hands and feet and rise directly to plank, or you can press up onto hands and knees before returning to downward facing dog.
If Warrior I posture (Virbhadrasana I) is not accessible to you, you can use a traditional lunge. Warrior I will get into the hip flexors and calves in a way that we often miss with stretching, but the lunge is more familiar for some practitioners and will allow a more direct quad stretch.
Ardha Skandasana
Ardha Skandasana is the cure for excessively linear, frontal plane movement. It stretches the inner thighs and hips while introducing a side-to-side fluidity that will only confront a cyclist or runner in an extreme bailout situation.
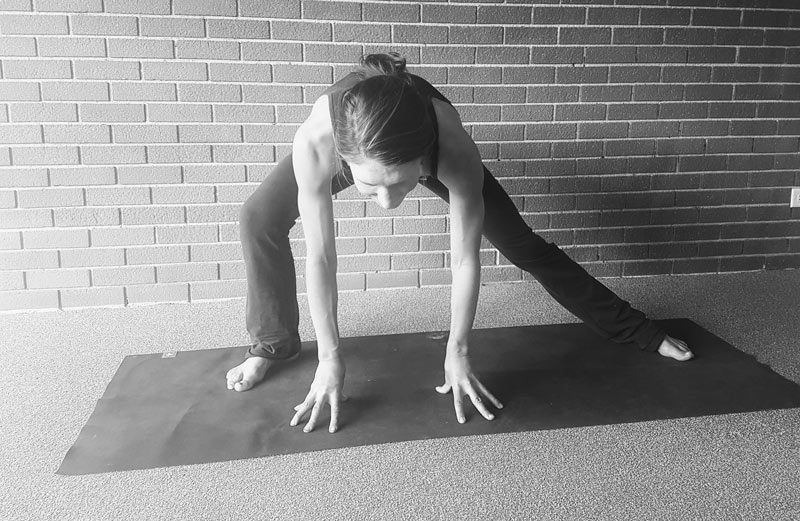
Face the long edge of your mat with your feet spread in a wide stance and your toes pointed slightly outward. Bend deeply into one knee, coming into a side lunge with your hand supporting you on the earth and your butt sticking out shamelessly behind you. Walk the hands to the opposite foot, bending it and straightening the first leg. Move back and forth. Be fluid. Change your pace and change your elevation. If the floor feels very far away, blocks make handy arm extenders.
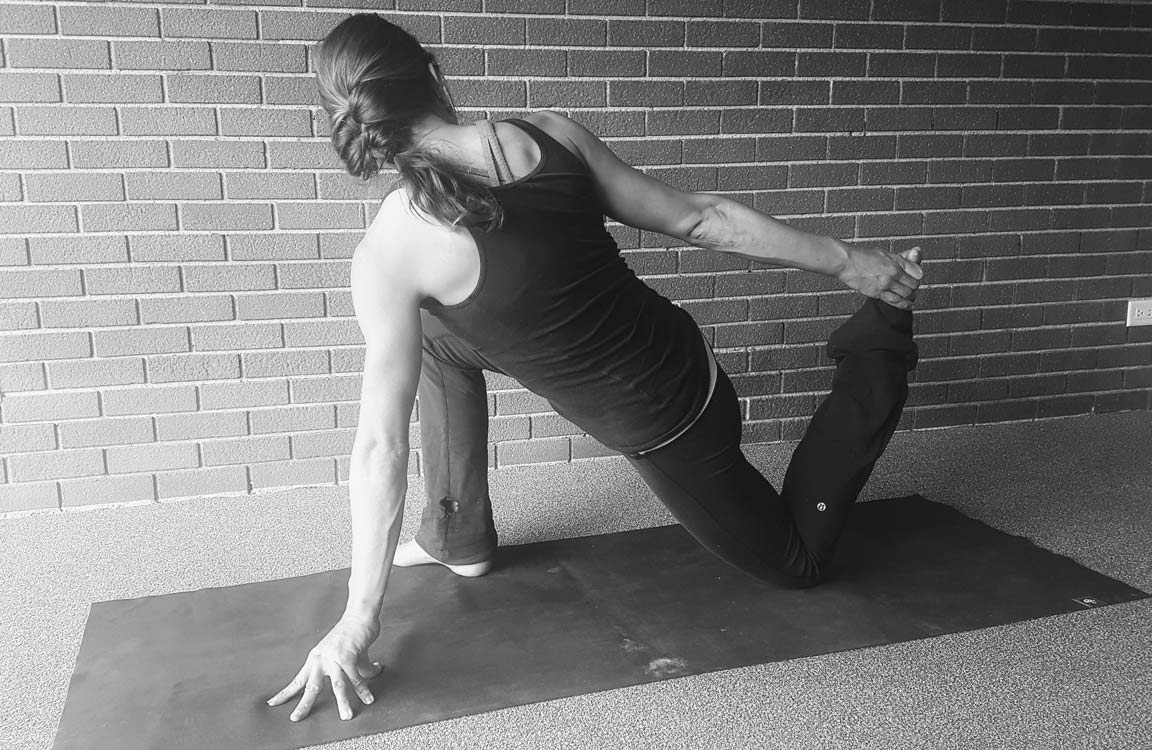
As a more advanced variation, begin in a lunge facing the front of the mat. Walk your hands along the ground until you spin over the shoulder of your trailing leg. Walk your hands through ardha skandasana until they reach the back foot, spinning over that shoulder to finish in a low lunge facing the back of the mat. Repeat. This variation introduces rotation into the hip and allows you to loosen and lubricate the entire joint. If it feels sticky or awkward at first, that means you should probably keep going.
Quad Variations
If this sequence can loosen up my quads, there’s nothing it can’t do.
These are best done with a wall behind you, and with your yoga mat folded in order to give your kneecap a bit more padding. Hold each variation for thirty seconds to one minute, and use the long hold as an opportunity to practice breath and pulsation. Kick the back foot into the wall or your hand, activating the quadricep as you inhale, and as you exhale, release the pressure and see if you are able to deepen a bit more into the stretch.
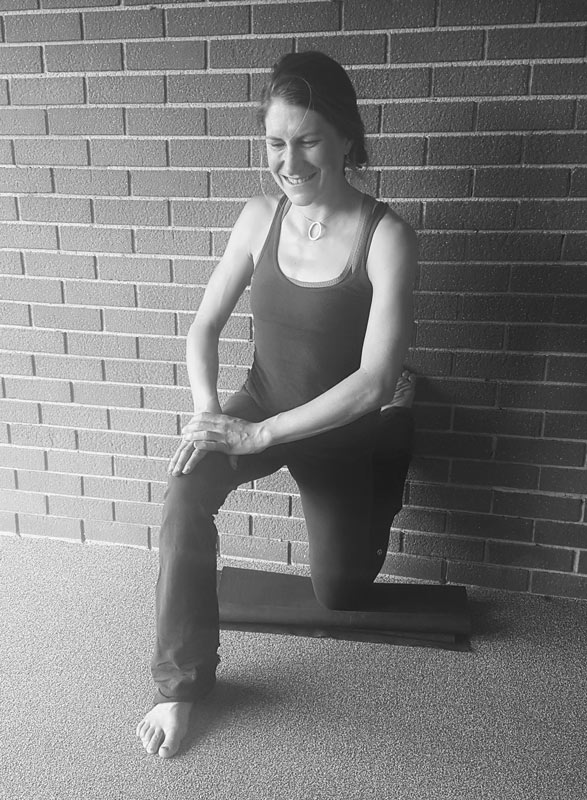
The starting position (below) is a lunge, with both hands on your front knee and your torso vertical. Scoot backwards toward a wall and bend your back knee so you can press the top of your foot into the wall (there is no elegant way to do this). Pad the top of your foot with a towel if it is uncomfortable. The closer you move your back knee toward the wall, the deeper the stretch. Your first instinct will be to arch and compress your lower back to compensate for tight hip flexors and quads. Don’t do it! Draw your low belly in and tuck your tailbone toward the ground. This may mean you have to move further away from the wall, and that is fine. As you tighten your core, notice how much that shifts the posture
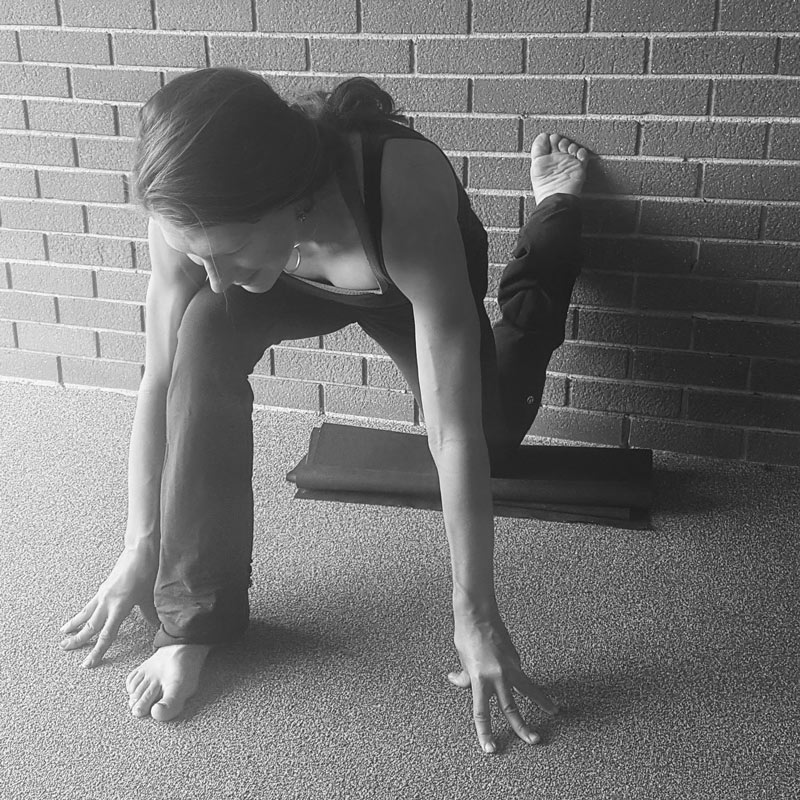
Leaving your back foot up the wall, scoot slightly forward and bring both hands to the floor, or to two blocks (chairs or water bottles are nice block substitutes at home). Keep kicking the trailing foot into the wall and notice how this changes the area of your quad that is being stretched.
► Free Cycling Training Assessment Quiz
Take our free 2-minute quiz to discover how effective your training is and get recommendations for how you can improve.
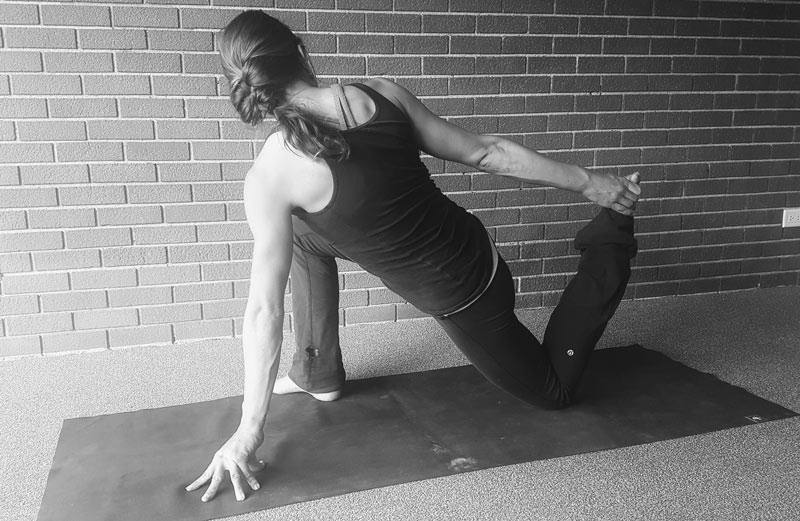
Come forward and away from the wall. Keep the hand opposite to the forward leg on the ground (or bring the ground to you with a block) and twist your torso toward the forward bent knee. Reach that arm back while bending the back knee and grasp the back foot from the arch. This not only provides a quad stretch and hip opener, but also opens the chest and introduces rotation into your spine. Use the kick and release technique against your hand in this variation. If you can’t reach your foot, maintain the twist toward the front leg, but simply press the top of the back foot into the wall behind you rather than reaching for it. That pressure will allow a similar, but milder, stretch.
Pigeon
- Bird that is fun to chase,
- A supreme hip opener,
- Both a) and b)
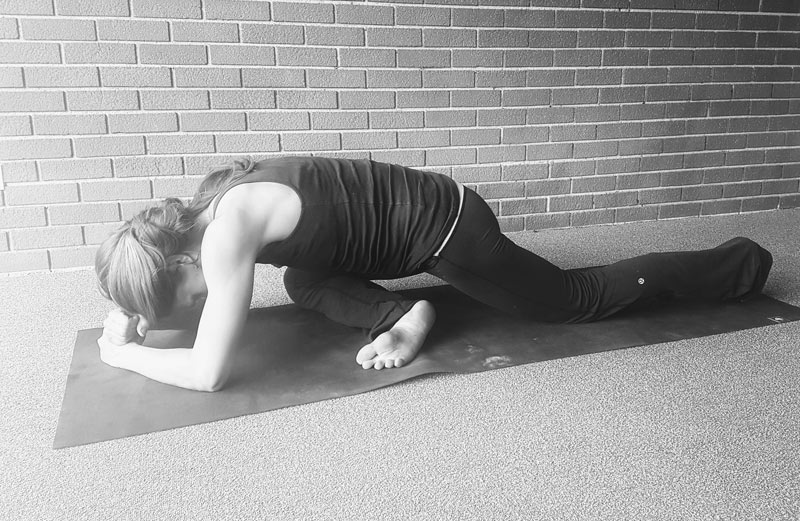
From a lunge, walk your forward foot toward the opposite hand. Allow that knee to relax to the floor, so that the sole of the foot peels up off the mat and the shin is parallel (or parallel-ish) to the front of the mat. Flex your front foot like crazy to keep pressure out of the knee joint! If your hips are high off the ground you can place a prop under the forward glute for support. I recommend something with a bit of give, such as a blanket, rather than a block as it will allow you to sink into the posture as your body opens. Take a deep breath in and extend your spine as long toward the ceiling as possible, then walk the hands forward as you fold your torso over your forward leg. This is another great prop opportunity – try placing something under your forehead so that you can relax completely.
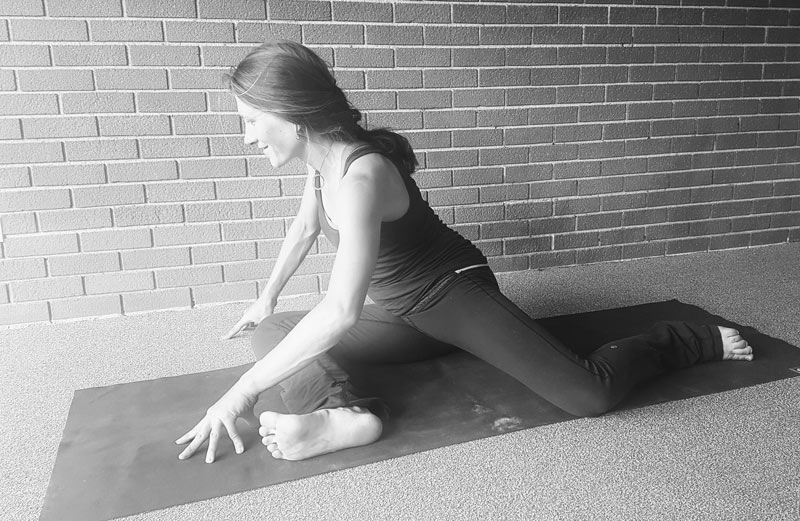
If this is inaccessible to you or feels like a strain, rock to the side of the forward leg and allow that glute to come all the way to the ground. Draw your back knee in so that it points straight out from your body, thigh perpendicular to the side of the mat with the knee bent at 90 degrees. Then, turn your torso to face toward the front of the mat again.
This one is a very deep hip opener, and it is one that demands subtle movement rather than a static hold. Stay still for a few breath cycles and then investigate what it would feel like to move the torso slightly to the left, or slightly to the right, to extend an arm, to shift the hips a bit side to side. Explore. Your favorite pigeon variation will change day-to-day. If you create enough support with props to allow your body to feel secure, pigeon can be very luxurious.
Supported Svansana
Svasana is the napping on your back posture that concludes most yoga classes. It is also the pose you most likely skip when you practice at home alone. For us constant movers, taking the time to allow your body and mind to release patterns of constant tension is critical, even if only for five minutes a day. Other poses are a preparation to allow your body to release and be comfortable in stillness. Skipping out on svasana is sort of like leading a race straight up until inches of the finish line – and then pulling out. Crossing the finish line was actually the entire point. Don’t skip your svasana.
You can make svasana even more delicious by supporting your spine. Placed a bolster or several blankets rolled together along the length of your spine, from sacrum to head. Do be sure, if your bolster is shorter, to place an additional support under your head so that you don’t strain your neck. Let your arms fall to your sides, palms up, with the back of your hands on the mat. Imagine the skin over your collarbones melting, and move your jaw from side to side to release tension held in your face. The support of the bolster opens your chest, reversing the patterns ingrained by spending hours bent over the stem of your bicycle.
If your lower back is uncomfortable lying on the floor in svasana, try bending your knees to 90 degrees with your feet flat on the mat. Allow your knees to gently fall in toward one another, releasing tension across the sacrum. Cover yourself with a heavy blanket, and allow yourself a few moments to fully supported.
—
Enjoy these poses, but do try to have a local pro look at your form to make sure you’re on the right track. Continue challenging your body to adapt to new patterns by getting to public classes when you can. Above all, show up on your yoga mat as frequently as you can, even…especially…if it’s just for a few moments of svasana.
► FREE Mini-Course: Learn How to Maximize Your Limited Training Time
Learn step-by-step how to overcome limited training time and get faster. Walk away with a personalized plan to increase your performance.
"*" indicates required fields

Comments 6
I have real life experience on practicing yoga. It strengthened my body and calmed my mind in a shot time.
Read : https://consumersprobe.com/yoga-burn-review/
Yoga poses for weight loss will help burn fat, build muscle tone, and give you more flexibility.
Read More: https://theyogamandala.com/yoga-burn-reviews/
Awesome advice
Excelente, me gusta todo aquello que me permite desenvolverme de mejor manera.
This is great and I find that with yoga you get a mind work as well (or should) as we spend so much physically training we don’t train mentally. And yoga works the body together not isolated making anything you do easier & for myself improved performance.
Thanks for a great read.
This is really great, thank you. It is SO great, in fact, that we need more of this, and, for the future, it will be really nice to have recordings of stuff like that with decent sound…