The Beginner’s Guide to Essential Bike Maintenance Skills
By Arleigh Jenkins (@bikeshopgirlcom)
I’ve worked in bike shops and the bike industry for a lot of years and I firmly believe that of the most important relationships you’ll ever have in cycling is with your local bike shop, and more specifically, with a mechanic you trust. But out on the road and in between trips to the mechanic, there are some essential mechanical skills every cyclist should know. Once you master these skills you will not only be a safer rider, but you will also avoid premature wear on your bike and accessories.
Safety Check Both Bike & Gear Before Rides
We all can get in a habit of simply hopping on our bike and riding off, assuming that our bikes are in the same condition as your last ride. A quick safety check before every ride should become second-nature, especially if you frequently travel with your bike (even to the group ride or the local trails). It’s rare, but even experienced cyclists have left a quick-release dangerously loose every once in a while. A full once-over every couple of hundred miles would also help you find minor problems before they become major ones!
Every Ride:
- Inflate tires & inspect for cuts or wear (explained below)
- Check headset of the bike by grabbing your front brake and rocking the handlebars back and forth. If you feel any movement or knocking your headset needs to be tightened. To confirm, you can put your fingers on the junction of the headset and frame as you rock the bike forward and back.
- Tug gently on the quick releases on both wheels to ensure they are fastened down snuggly. When in doubt, open completely and retighten.
- Grab each brake lever individually and pull tightly while trying to roll your bike forward. Your brakes should fully engage and keep your wheel from moving.
- Pick up the front end of your bike and softly spin your wheel. The wheel shouldn’t brush up against your brake pads. Repeat with the rear wheel of your bike.
Every 2 weeks or 200 Miles, whichever comes first:
- Lube & check chain life (explained below). If you’re riding in excessively dry or wet conditions, you may need to lube your chain more frequently. A dry chain will squeak and squeal. A dirty chain will sound gritty and crunchy.
- Inspect brake pads front and rear. Most pads have grooves in them, and you should see daylight looking through those grooves when looking from the top of the bike down through the brake pads. If your pads are so worn there are no grooves visible, they need to be replaced.
- Inspect cleats on your shoes to ensure they aren’t worn too thin.
- Remove your wheels and wipe off your frame top to bottom while looking for any imperfections in the paint or frame.
- Pat yourself on the back for being a wonderful bike owner.
Properly Inflate Tires & Fix a Flat
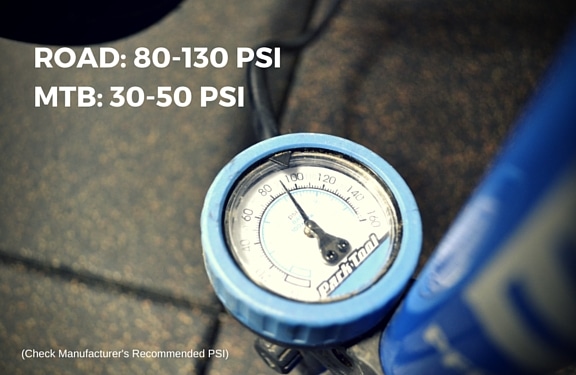
Your performance road bike tires need their air checked every 3-4 days depending on storage conditions. These tires hold very low volume of air under very high pressure. Keeping tires at the right pressure typically between 80-130 psi, depending on rider weight, tire size, and road conditions, will make your tires last longer, prevent flat tires, and provide a reliable riding surface (always stay within the manufacturer’s recommended pressure).
Mountain bike tires can be checked less frequently as they have higher volume under lower pressure, but I still check mine every ride as a few psi difference can drastically change the handling of a mountain bike. Mountain bike tires are generally inflated between 30-50 psi, but again that depends on the tire volume, rider weight, and trail conditions.
Fixing a flat tire does not have to be as intimidating as it sounds. Practice at home while watching a video several times and carry everything you need to fix a flat with you on a ride!
Recommended gear to carry with you to fix a flat:
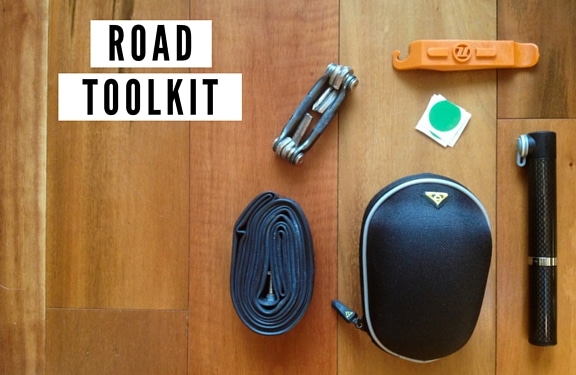
1 Tube that fits your bike. Keep in mind, it’s not just the tube size that matters, but also the length of the Presta valve, especially for medium and high profile carbon rims.
1 Patch kit to repair tubes in a pinch
1 Inflation device – I am keen to a pump that is both a CO2 inflator, and a hand pump
2 CO2 cartridges that fit your pump
2 Tire levers
1 $5 bill to boot your tire, or pay a friend for their tube
How to Lube & Check Your Chain
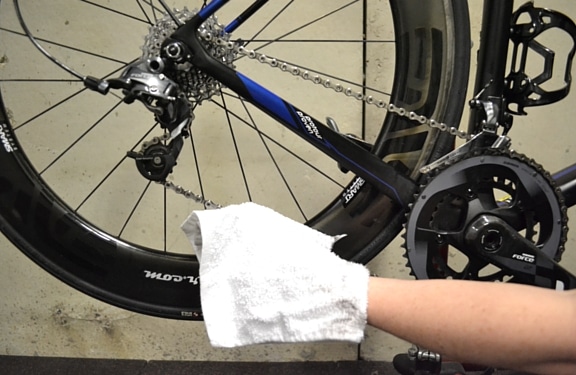
Properly lubing a bike chain is one of the most underutilized skills of bike ownership, next to knowing how to change a flat tire. Keeping your chain clean and lubed will prolong your drivetrain life and save you a great amount of money in the long run!
► Free Cycling Training Assessment Quiz
Take our free 2-minute quiz to discover how effective your training is and get recommendations for how you can improve.
Steps in lubing your chain:
- Lean your bike against a wall in an area where the ground can get dirty
- Clean off your chain with an old rag or sock by gently grabbing the bottom section of your chain and back pedaling. About once a month, or anytime your your chain is especially dirty, using a chain cleaning tool (like this one) will make the job easier. You don’t need to use a cleaning tool every time you relube the chain.
- After you have cleaned off your chain apply a gentle stream of your favorite lube (I personally use a Dry Lube) on that bottom section of your chain again while backpedaling 3 or 4 full rotations
- Let the lube soak in for a while and then wipe off the access with a clean section of your rag by duplicating Step 2. I recommend to customers in the shop to lube their chain after a ride and wipe off the excess before they ride. The goal of lubing your chain is to penetrate inside the links, and not bathe the chain in lube.
- Your chain should have a nice glisten to it, but never sweaty or squeaking.
How to Adjust a Cable Pulled Derailleur and Brakes
Although electronic shifting is growing in popularity, most bikes still use cables to pull brakes and derailleurs. These cables work under tension, and understanding this tension is key to having reliable brake and shifting systems.
Adjusting Road Brake Tension
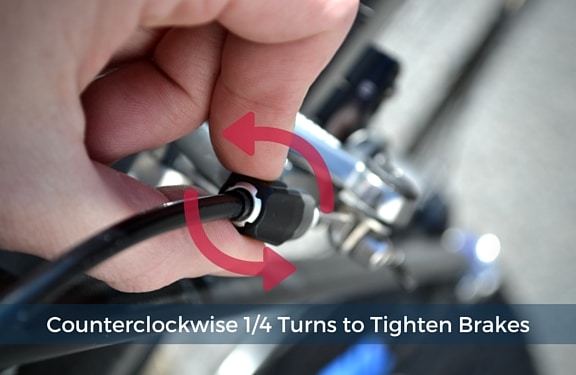
Over the course of a few hundred miles, your brake pads will wear down and you’ll want to pull in the pads so that you have that nice firm braking modulation.
To do this you need to tighten the brake cable, or add tension to it, by simply turning the barrel adjuster on the brake caliper ¼ turn at a time. If you are looking down at the barrel adjuster from the bike towards the brake caliper, turning counter-clockwise and essentially turning that adjuster out of the caliper (lefty loosey) and taking up room on the cable. This tightens the cable from the brake lever to caliper and moves the brake pads closer to the rim. If your brakes feel too tight, turn the adjuster clockwise ¼ of a turn at a time.
Adjusting Road Derailleurs
Derailleurs are a complicated system and probably one of the most complicated parts of your bike, but making basic adjustments on them is remarkably simple! Your bike should come fully tuned and ready to ride but often after the first 100 miles your gears don’t feel as crisp as they did on day one. You aren’t imagining anything. Typically, it takes a couple good rides for everything to set in, but the good news is that after this break in period you shouldn’t need to adjust too much until you replace cables or parts.
To fine tune your shifting we are using the same idea as the brakes, using barrel adjusters to increase or decrease tension on a cable, either directly on your rear derailleur, at the front of your frame, or built in-line with your cable system. This can be done from either the saddle of your bike, or when your bike is hanging from something like a stand or tree.
Front Derailleur Adjustment
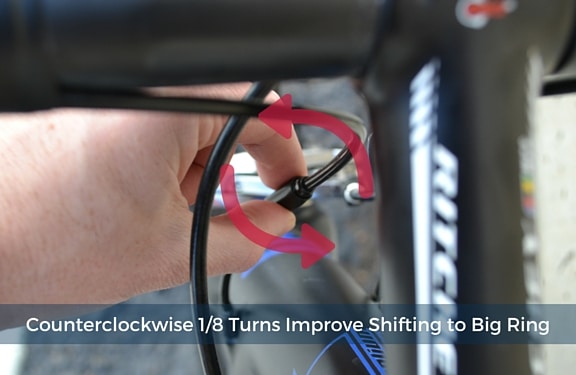
Keep in mind: The front derailleur pulls opposite of the rear and moves much further between shifts. If your front derailleur is not shifting smoothly to a hard gear turn the cable adjuster that is connected to the cable from your left shifter counterclockwise 1/8 – 1/4 of a turn at a time. Do the opposite if it isn’t shifting to an easy gear. Repeating the steps above until perfect.
Please note that depending on how your inline cable barrel adjuster was installed it can change the direction you need to turn the barrel adjuster. If you are trying to adjust shifting to move the derailleur out further when you shift to the big ring, you need to increase the cable tension by unthreading the barrel adjuster which will effectively lengthen the cable length. The opposite is true when adjusting to the small ring.
REAR DERAILLEUR ADJUSTMENT
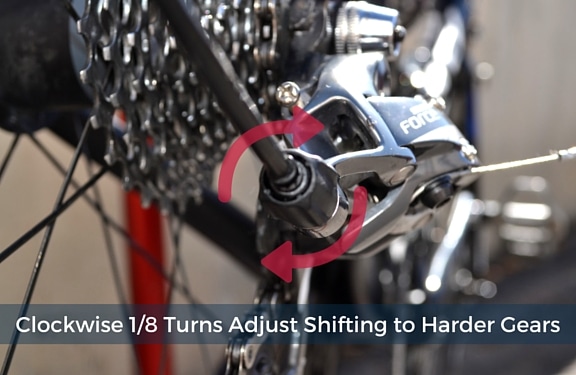
If you don’t have a cable adjuster at your right shifter for your rear derailleur, you can use the barrel adjuster at the rear derailleur to make micro-adjustments. If your chain is not shifting to harder gears (the smaller cogs) smoothly, turn the barrel adjuster clockwise 1/8 of a turn at a time. This reduces tension on the derailleur cable and moves the chain toward smaller cogs. Test the shifting for any improvement after each 1/8 turn. If the shifting is now slow to the easier gears (the larger cogs) turn the barrel adjuster counterclockwise 1/8 of a turn at a time and test again for smoother shifting. Use the same concept if you’re adjusting the rear derailleur cable tension from either an inline barrel adjuster or one located at the front of your frame. More cable tension moves the chain in the direction of larger cogs; less cable tension moves the chain in the direction of smaller cogs.
Prepare to Perform Your Best
Becoming a great cyclist isn’t only about developing your engine, but keeping your bike ready to perform as well as you do. Take some time each week or month to practice the above skills to keep your bike running as well as you are.
Related Articles
5 Things You Need to Fix to Go Faster!
CTS Athlete Insight: What I Learned in My First Month of Coaching
The Best Winter Cycling Clothing Tips
► FREE Mini-Course: Learn How to Maximize Your Limited Training Time
Learn step-by-step how to overcome limited training time and get faster. Walk away with a personalized plan to increase your performance.
"*" indicates required fields

Comments 29
Quick Desk offers premium Coworking Spaces Hyderabad with office conference rooms, flexible desks, and collaborative working space for every need.
Join a vibrant community of professionals and elevate your workday in Hyderabad’s top coworking environment.
QuickDesk is a smart, user-friendly sales engagement and CRM platform designed to boost productivity.
It helps businesses manage leads, automate follow-ups, and close deals faster.
With real-time analytics and multi-channel communication, teams stay organized and efficient.
QuickDesk simplifies complex sales processes with powerful automation tools.
Ideal for growing businesses, it turns sales efforts into measurable success.
Coworking space Hyderabad
#coworking space Hyderabad
#conference rooms
#spaces desk
Thanks for sharing was really soo helpful
Pingback: Essential Tools for BMX Bike Maintenance - Best Bike Guide
Thanks for sharing this information.best addiction treatment center in Islamabad
Thanks a lot for this article. It was really informative for me.
Maybe I missed it, but I didn’t read anything about lubing the wheel bearings, the main crank bearings, the pedal bearings, or the steering bearings. Not all of us can afford sealed bearings.
but your name is Tom FORTUNE
Pingback: A Comprehensive resource guide on cycling - Boundless Biker
Chains are often the hardest part on our bikes and I learned how to assemble the bike back into the derailleur including the important connections. How do you safely adjust the bike chain on the Derailleur? First raise your bike wheel, chain your bike over the derailleur that glides behind the bike and around the front sprocket. Let go of the derailleur that follows and secures a well-fitting bike. Adjust your bike by the small part of the front gear, rotate the handle to run into the rope, connect the two links.
Maybe I missed it, but I didn’t read anything about lubing the wheel bearings, the main crank bearings, the pedal bearings, or the steering bearings. Not all of us can afford sealed bearings.
great informative. Thanks for sharing
Great site!!
Recently I have found an awesome site to help repair my bike. It has really easy step to step videos to watch and has helped me fix all my bike repair problems.
https://bit.ly/3aXLQKv
Thanks for sharing this informative information.
Pingback: The 5 Best Bikes for Plus-Sized Women (up to 300lbs)
My husband weighs around 110kgs and was advised to ride a bike. What are the types of bikes which cater to that weight and also durability? Is BMX good for that too? It’s mainly on the road. Thank you.
i would suggest a something between a road bike and a mountain bike. Like a road bike with suspension or something.
Thanks for these great tips. I also liked checking out this site as well.
https://bicyclerepairtips.wordpress.com/
I have a bicycle. I want to maintain my own bike properly. So here you wrote about the maintenance of the parts of the bicycle. I read many blogs but you explain very well. Thanks for sharing this blog with me and the whole people.
Thanks for writing such an informational post
Your website is really cool and this is a great article.
Great Content by the way 🙂
My husband recently bought a hybrid bike for me. Thanks for this information. Now can go for my weekend riders without any worry.
I have a bicycle. I want to maintain own bike properly. So here you wrote about the maintenance of the parts of the bicycle. I read many blogs but you explain very well. Thanks for sharing this blog with me and the whole people.
I have a bicycle. I want to maintain own bike properly. So here you wrote about the maintenance of the parts of the bicycle. I read many blogs but you explain very well. Thanks for sharing this blog with me and the whole people.
Hi Sir,
i need sport coaching sites for guest post please tell me each post price
https://trainright.com/th
We need do-follow link
Permanent post
payment through to PayPal
Waiting for your kind reply…..
Thanks a lot !
this is poop and is purly based on racing bikes not all bikes so it should be changed to bike maintanince on racing bike
With proper maintenance, a good set of wheels will keep you safe and riding for thousands of miles. Thanks for sharing this brilliant piece. Keep sharing!
Pingback: 5 Bike Fit Tips That'll Improve Your Comfort and Power - CTS
GREAT article!
I would like to share a different technique for adjusting my rear cable derailleur that has worked very well for me. First, I sight the derailleur from behind to make sure it is straight vertically. If the dererailleur cage isn’t perfectly vertical, the gears can never be adjusted well because of a bent derailleur hanger. (Check this every time after a crash–it’s a leading cause of poor shifting after a crash.) This means either a new derailleur hanger or a $75 tool from Park Tool to straighten a bent derailleur hanger, usually a $15-$20 part.
As long as the derailleur hanger is straight, first shift all the way to the biggest cog in the cassette. (Which chain ring you use isn’t as important, but generally choose the one you use more.) Then shift the rear derailleur five or six clicks to the center of the cassette. Sight the derailleur cage again, and turn the adjuster on the cable until the upper jockey wheel is perfectly aligned with the gear; this should set the indexing. Then run through all the gears to make sure the shifting is good–and it almost always is! (This assumes that the upper and lower limit scores have been adjusted properly to make sure the chains doesn’t shift off the cassette either to the outside or inside, but once these have been set there’s usually no need to check them very often at all.)
This is basically the technique recommended in the Park Tool Big Blue Book, which I consider a necessity in any tool kit.
Thank you. It’s the little things that matter most. I can always depend on CTS.